Posts

Easy Texture making|Texture making techniques

Image
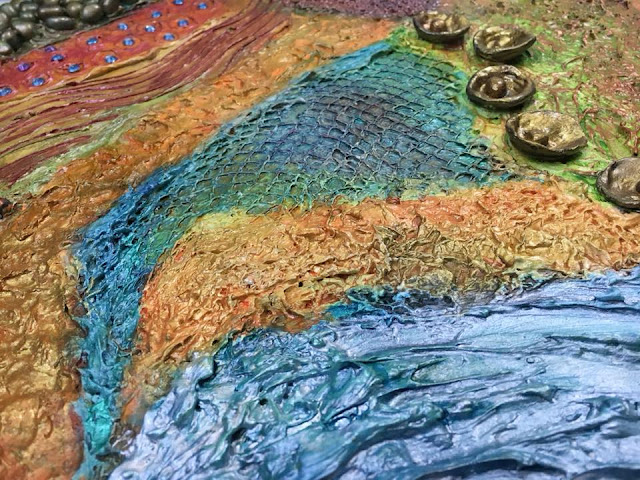
Hi Guys, I am going to share my texture canvas painting today. I love different texture making techniques and I thoroughly enjoyed making this. Here is the completed picture of my canvas.     Here are the pictures of step by step procedure. 1. I first had applied white gesso on a 12 by 16 stretched canvas 2. Once Gesso was dried, I make some textures on the canvas using texture paste, aluminium foil, tissue paper, a plastic bag container (fruit bag), some shells that I made out of airdry clay, glass beads. 3. Once the textures were dried, I applied first layer of acrylic colour. I added a lot of water to the acrylic colours. 4. Once the first layer of acrylic was dried, I applied the second layer of acrylic colours. The colours have to dry completely before, we add a second layer on it. 5. Once the second layer was dried, I applied a layer of metallic colour on it. For the metallic colour, I used some water and for some of the colours, I used dry

Best way to recycle a tin can

Image
Hi Everyone, Here I am again with my new upcycling project. Last week I found a tin can in my kitchen and I realised yay!!!! I got something to upcycle. :) And I made a holder for my brushes. I am using this as a brush holder. However, you can use it as a pen holder or as a planter as well. Materials I have used: 1. An old tin can 2. Acrylic primer or you can also use gesso. (I use asian paint wall primer for my project. I had purchased it from a hardware store). 3. Any designer thread (I had got golden thread from a stationary shop) 4. Tissue paper 5. Acrylic colours (I have used Fevicryl prussian blue and white colour) 6. Silver Metallic colour (I have used Wonder Gold metallic paint, I got this from a hardware store) 7. Decoupage napkin of your choice(I had purchased the deciupage napkins from itsybitsy.in) 8. Decoupage glue (I had purchased the glue from itsybitsy store) Crafting tools I have used: 1. Brush Step by step picture tutorial is as below:

How to reuse old she box

Image
Last week I found a old shoe box in my home and thought of giving the an antique look to the box. So here are the steps to upcycle an old shoe box to an antique look organiser. 1. First I got a shoe box. 2. Then I crushed some old news paper and covered the entire shoe box with the crushed paper using glue. The paper is crushed to get a pattern on the box. Then I divided the top part of the box into twelve equal parts. 3. Then I traced the borders of the box and the divided parts using hot glue. 4. Then I got a printout from the internet and cut the design details using a detail pen knife. You can get your own antique design for this step. 5. Then I glued the small designs into the divided parts of the box and traced the designs using hot glue. 6. Then I painted the hot glue portions using a acrylic primer. This step is optional. You may skip this. 7. Once the primer was dried, I painted the entire box with black acrylic. 8. O nce the colour was dr

Beautiful bottle Decoration|Pattern Making|Texture Making|Antique look|Vintage look|Wine Bottle

Image
Hi everyone. Here it goes. My blog on the procedure to create texture on an old bottle. Step1: First I got an old beer bottle. Step2: Then I painted the entire bottle using acrylic primer. Step3: Once the primer was dried, I pasted wall putty on the entire bottle. You can get wall putty from any any of the hardware store. You can also use texture paste in this step. I use wall putty as I find the texture paste to be too expensive. Step4: Then I traced a free hand texture on the bottle. You can draw any pattern as you may like. Step5: Once the putty was dried, I painted the entire bottle using acrylic colour. I have used tortoise blue colour. You can use any colour of your choice. Step6: Once the colour was dried, I applied bronze metallic acrylic colour on the patterns of the bottle using a sponge brush. Step7: Then I did a little decoration on the bottle using some of my DIYed flowers. I had made these flowers using foam sheet. Step8: And then I g